
Agent P, aka Perry the Platypus Birthday Cake
Serves 30 to 40.
Servings 30
Equipment
- Agent P toy or photo
- 11” x 15” x 2” cake pan, greased with a layer of parchment in the bottom
- stand mixer with paddle attachment, or hand mixer and large bowl
- wax paper or silicone mat
- 32-ounce yogurt or cottage cheese container with lid (about 4-½ inches across)
- 4 (8-inch) chopsticks
- 13” x 19” cake board, covered with foil
- corrugated cardboard square, approximately 7” x 7”, covered with foil
- 3 #3 piping tips + coupler
- 1 #16 star tip + coupler
- 4 quart-sized freezer bags (for piping frosting)
- angled frosting spatula
- popsicle sticks (for portioning gel colors)
- green florist foam (optional)
Ingredients
- 2 batches cake chocolate cake, yellow cake, or other cake of your choice
- 2 batches vanilla frosting no shortening OR
- 2 batches vanilla frosting with shortening (We only use shortening when the weather is really hot and humid.)
- 1 batch chocolate frosting
- teal frosting gel color
- leaf green frosting gel color
- orange frosting gel color
- black frosting gel color
- 3 batches marshmallow treats Add 2 extra cups of cereal per batch.
- 8 inch piece of pita bread
Instructions
Make Ahead
- FROSTING - Make both batches of the vanilla frosting. Reserve ¼ cup for white. Tint 2-¾ cups leaf green. Tint 1-¼ cups orange. Tint 1-¾ cups teal. Make the chocolate frosting. Tint ¼ cup dark brown using a touch of black. The color improves while sitting, so you can make this a day or two ahead of time. Refrigerate if making ahead.
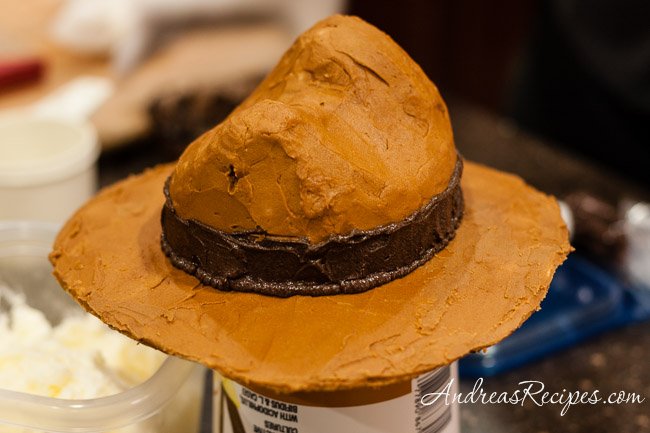
- PERRY HAT – Lightly toast an 8 to 9-inch piece of pita or other flatbread. While it’s warm, gently shape the bread to form the rim of the fedora hat, curled up in the back and slightly down in the front. You can prop the back edge on an oven mitt to help keep its shape while it cools overnight. Using the yogurt container lid as a pattern, cut 3 rounds of the marshmallow treats and stack them on top of each other, compressing with your hands. Cut two small triangles and shape them for the front and back of the hat, and place on top of the stacked marshmallow treats.
- PLATYPUS BODY – Cut 6 more rounds of marshmallow treats. Stack 4 on top of each other and press them together. Cut a 4” x 8-½” rectangle of marshmallow treats and trim the corners, then round them using your hands. Press the 4 chopsticks lengthwise across the beak, trimming the ends as necessary. Use some of the marshmallow treat trimmings to build up over the ends of the chopsticks at the front edge of the beak. Turn the beak back over and place it on top of the body. Stack the remaining 2 rounds of marshmallow treats on top of the beak, pressing them together. Use some of the trimmings to mold the ridge in the middle of the beak and the bump outs on the sides of the beak. Use the other trimmings to mold the eyes.

- PLATYPUS TAIL – Cut a 6” x 4” rectangle of marshmallow treats, then shave the long sides so it tapers down to 3” at the bottom.

Decorating
- AGENT P – Using the angled spatula, spread a crumb layer of the teal frosting over the body and back and top of the head. Use the orange frosting to put on a crumb layer over and under the beak. Allow to dry. Finish the body with the final layer of teal frosting and the beak with the final layer of orange frosting. Spread on the white frosting for the eyes, then using #3 tips, pipe on some chocolate frosting for the eyes and a finishing edge of teal around the eyes.

- HAT – Use the angled spatula to spread on a crumb layer of the chocolate frosting on the top and under the rim of the hat , then set it on an inverted yogurt or cottage cheese container and allow it to dry. Spread on the final layer of chocolate frosting and use the dark frosting to spread the band around the hat. Using a #3 tip, pipe more dark chocolate around the edges of the band.

- TAIL – Using the angled spatula, spread a crumb layer of orange frosting on both sides and around the edges of the tail. Allow to dry, then spread on the final layer of orange. Use the edge of a knife to draw a cross-hatch pattern on the top side of the tail.
- CAKE – Use the foil-covered square piece of cardboard as a pattern to cut out a square of cake from one side, then place the cutout on the cardboard square. Spread the leaf green frosting around the outside edge of the base cake and the chocolate frosting around the inside of the cut area and around the outside edges of the cutout. Use the #16 tip to pipe stars all over the top of the base cake and the cutout cake. (Note: At the time we incorrectly estimated the amount of frosting required and had to leave a bare space that would go under the cutout, but the recipe has been written to have enough frosting.)



Assembly
- Place Agent P inside the cutout area of the base cake. Place the tail inside the cutout area with the narrow side propped against the platypus body and the rest laying over the cake. It may bend slightly and that’s ok.
- Place the hat on top of the the platypus head with the curled brim in the back. Make sure it’s low over the eyes.
- Place the cutout piece of cake on top of the base cake off to the side and a little angled.